Amazing DIY Diecast Cars Projects
Embark on a thrilling journey into the world of diecast car customization with our comprehensive DIY guide. Whether you’re a seasoned hobbyist or a curious beginner, this article unveils a range of exciting projects to transform ordinary diecast models into stunning masterpieces. From custom paint jobs and wheel upgrades to intricate interior detailing and realistic weathering effects, you’ll discover a wealth of techniques and inspiration to bring your vision to life. Get ready to unleash your creativity and build a unique collection of personalized diecast cars that reflect your passion and skill. The possibilities are endless, and the satisfaction of creating something truly unique is unmatched. Let’s dive in!
Choosing the Right Diecast Car for DIY
The first step in any successful DIY diecast car project is selecting the right model. Consider the scale of the car, as this will influence the level of detail you can achieve and the availability of aftermarket parts. Popular scales include 1:18, 1:24, and 1:43, each offering different challenges and opportunities for customization. Additionally, choose a car that inspires you and aligns with your project goals. Consider the existing features and details, as this will serve as the foundation for your modifications. Look for models with a decent level of detail that are easy to disassemble. The material of the car is also an important factor, as different materials will react differently to paints and adhesives. A metal diecast is often a great choice for projects.
Scale Selection 118, 124, and More

Diecast cars come in various scales, each offering a unique set of advantages and considerations for DIY projects. 1:18 scale models are larger, providing ample space for detailed modifications and intricate detailing. These models are perfect for projects that require a high level of precision and visual impact. 1:24 scale models offer a balance between size and detail, making them a popular choice for many hobbyists. These models are often more affordable than their 1:18 counterparts while still providing enough room for customization. Finally, 1:43 scale models are smaller and more compact, making them ideal for collectors with limited display space. While they may present some challenges in terms of detailing, these models can be a great option for beginners or those looking for a quick and easy project. Consider the space you have available, the level of detail you wish to achieve, and your budget when choosing the right scale for your DIY diecast car project.
Material Gathering Tools and Supplies
Before you begin your DIY diecast car project, it’s essential to gather all the necessary tools and supplies. This will ensure a smooth and efficient workflow, allowing you to focus on the creative aspects of your project. Prepare your workspace with adequate lighting and ventilation, especially when working with paints and adhesives. Gather essential tools such as screwdrivers, pliers, hobby knives, sandpaper, and masking tape. Choose high-quality paints, primers, and clear coats specifically designed for plastic or metal surfaces. Additionally, select appropriate adhesives for bonding different materials. Don’t forget detail brushes, paint thinners, and other accessories to help you achieve the desired finish. By having all the necessary items readily available, you’ll be well-prepared to bring your diecast car visions to life.
Essential Tools for Diecast Car Customization
Having the right tools is essential for any DIY diecast car customization project. Start with a basic set of tools, including screwdrivers, pliers, and hobby knives. These will be used for disassembling the car and making various modifications. A good set of files and sandpaper of varying grits will be needed for smoothing surfaces, removing imperfections, and preparing the car for painting. A cutting mat protects your work surface. Detail brushes of different sizes will be necessary for applying paint to small areas and adding fine details. Consider a rotary tool with various attachments for more advanced modifications. Safety glasses and a respirator are crucial for protecting yourself from dust, fumes, and flying debris. With these tools, you’ll be well-equipped to tackle a wide range of customization projects.
Paints, Adhesives, and Detailing Supplies

Choosing the right paints, adhesives, and detailing supplies is critical for achieving a professional finish on your diecast car. Acrylic paints are a popular choice for their ease of use, low odor, and quick drying times. Enamel paints provide a durable and glossy finish. Use a high-quality primer to prepare the surface for painting and to promote paint adhesion. Select adhesives specifically designed for plastic or metal, such as super glue or epoxy. For detailing, invest in fine-tipped paint pens, weathering powders, and clear coats to add realistic effects and protect your work. Masking tape and masking fluid are invaluable for creating clean lines and preventing paint from bleeding. By selecting the right supplies, you’ll be able to achieve a stunning and long-lasting finish on your diecast car project.
DIY Project 1 Custom Paint Job
A custom paint job is one of the most impactful ways to transform a diecast car. It allows you to personalize the model with unique colors, designs, and finishes. The process involves several steps, including preparing the surface, applying primer, painting the base coat, adding details, and applying a clear coat. The preparation is crucial for a smooth and even finish. Start by carefully disassembling the car and removing any existing paint. Then, use sandpaper to smooth out any imperfections and create a surface that will allow the paint to adhere properly. Once the surface is prepared, apply a primer coat to provide a base for the paint and improve adhesion. Choose a base coat color that complements your overall design. After the base coat is completely dry, you can begin adding details such as stripes, logos, or other graphics. Finally, apply a clear coat to protect the paint and give the model a glossy finish. This project offers the most amount of creative freedom.
Preparing the Diecast Car for Painting
Proper preparation is the foundation of a successful custom paint job. Begin by disassembling the diecast car, removing the wheels, windows, and any other parts that could interfere with the painting process. Clean the surface thoroughly with a mild detergent and water to remove any dirt, grease, or fingerprints. Use sandpaper to remove the factory paint and create a slightly rough surface for the primer to adhere to. Be careful not to damage any details or delicate features. Then, mask off any areas that you don’t want to be painted, such as the windows and interior components. It’s essential to mask all areas. Ensure everything is well-masked. Taking your time with this stage is important, as it will significantly impact the final result.
Applying Primer and Base Coats

After preparing the car, the next step is to apply a primer. Primer provides a smooth, even base for the paint and helps the paint adhere to the surface. Apply a thin, even coat of primer, allowing it to dry completely before applying a second coat if necessary. Once the primer is dry, it’s time to apply the base coat. Choose your desired color. Apply the base coat in thin, even layers, allowing each layer to dry completely before applying the next. Avoid applying thick coats of paint, as this can lead to runs and drips. Use multiple thin coats to achieve full coverage and a smooth finish. Pay attention to the manufacturer’s instructions for drying times and recommended application techniques.
Adding Details and Finishing Touches
With the base coat applied and dry, it’s time to add details and finishing touches. This is where you can get creative and personalize your diecast car. Use masking tape and precision tools to create stripes, patterns, or other designs. Use fine-tipped paint pens to add details such as logos, badges, or lettering. Once all the details are complete and dry, apply a clear coat to protect the paint and give the model a glossy finish. The clear coat will also provide a smooth, even surface that enhances the overall appearance. Allow the clear coat to cure completely before reassembling the car. This is a critical step.
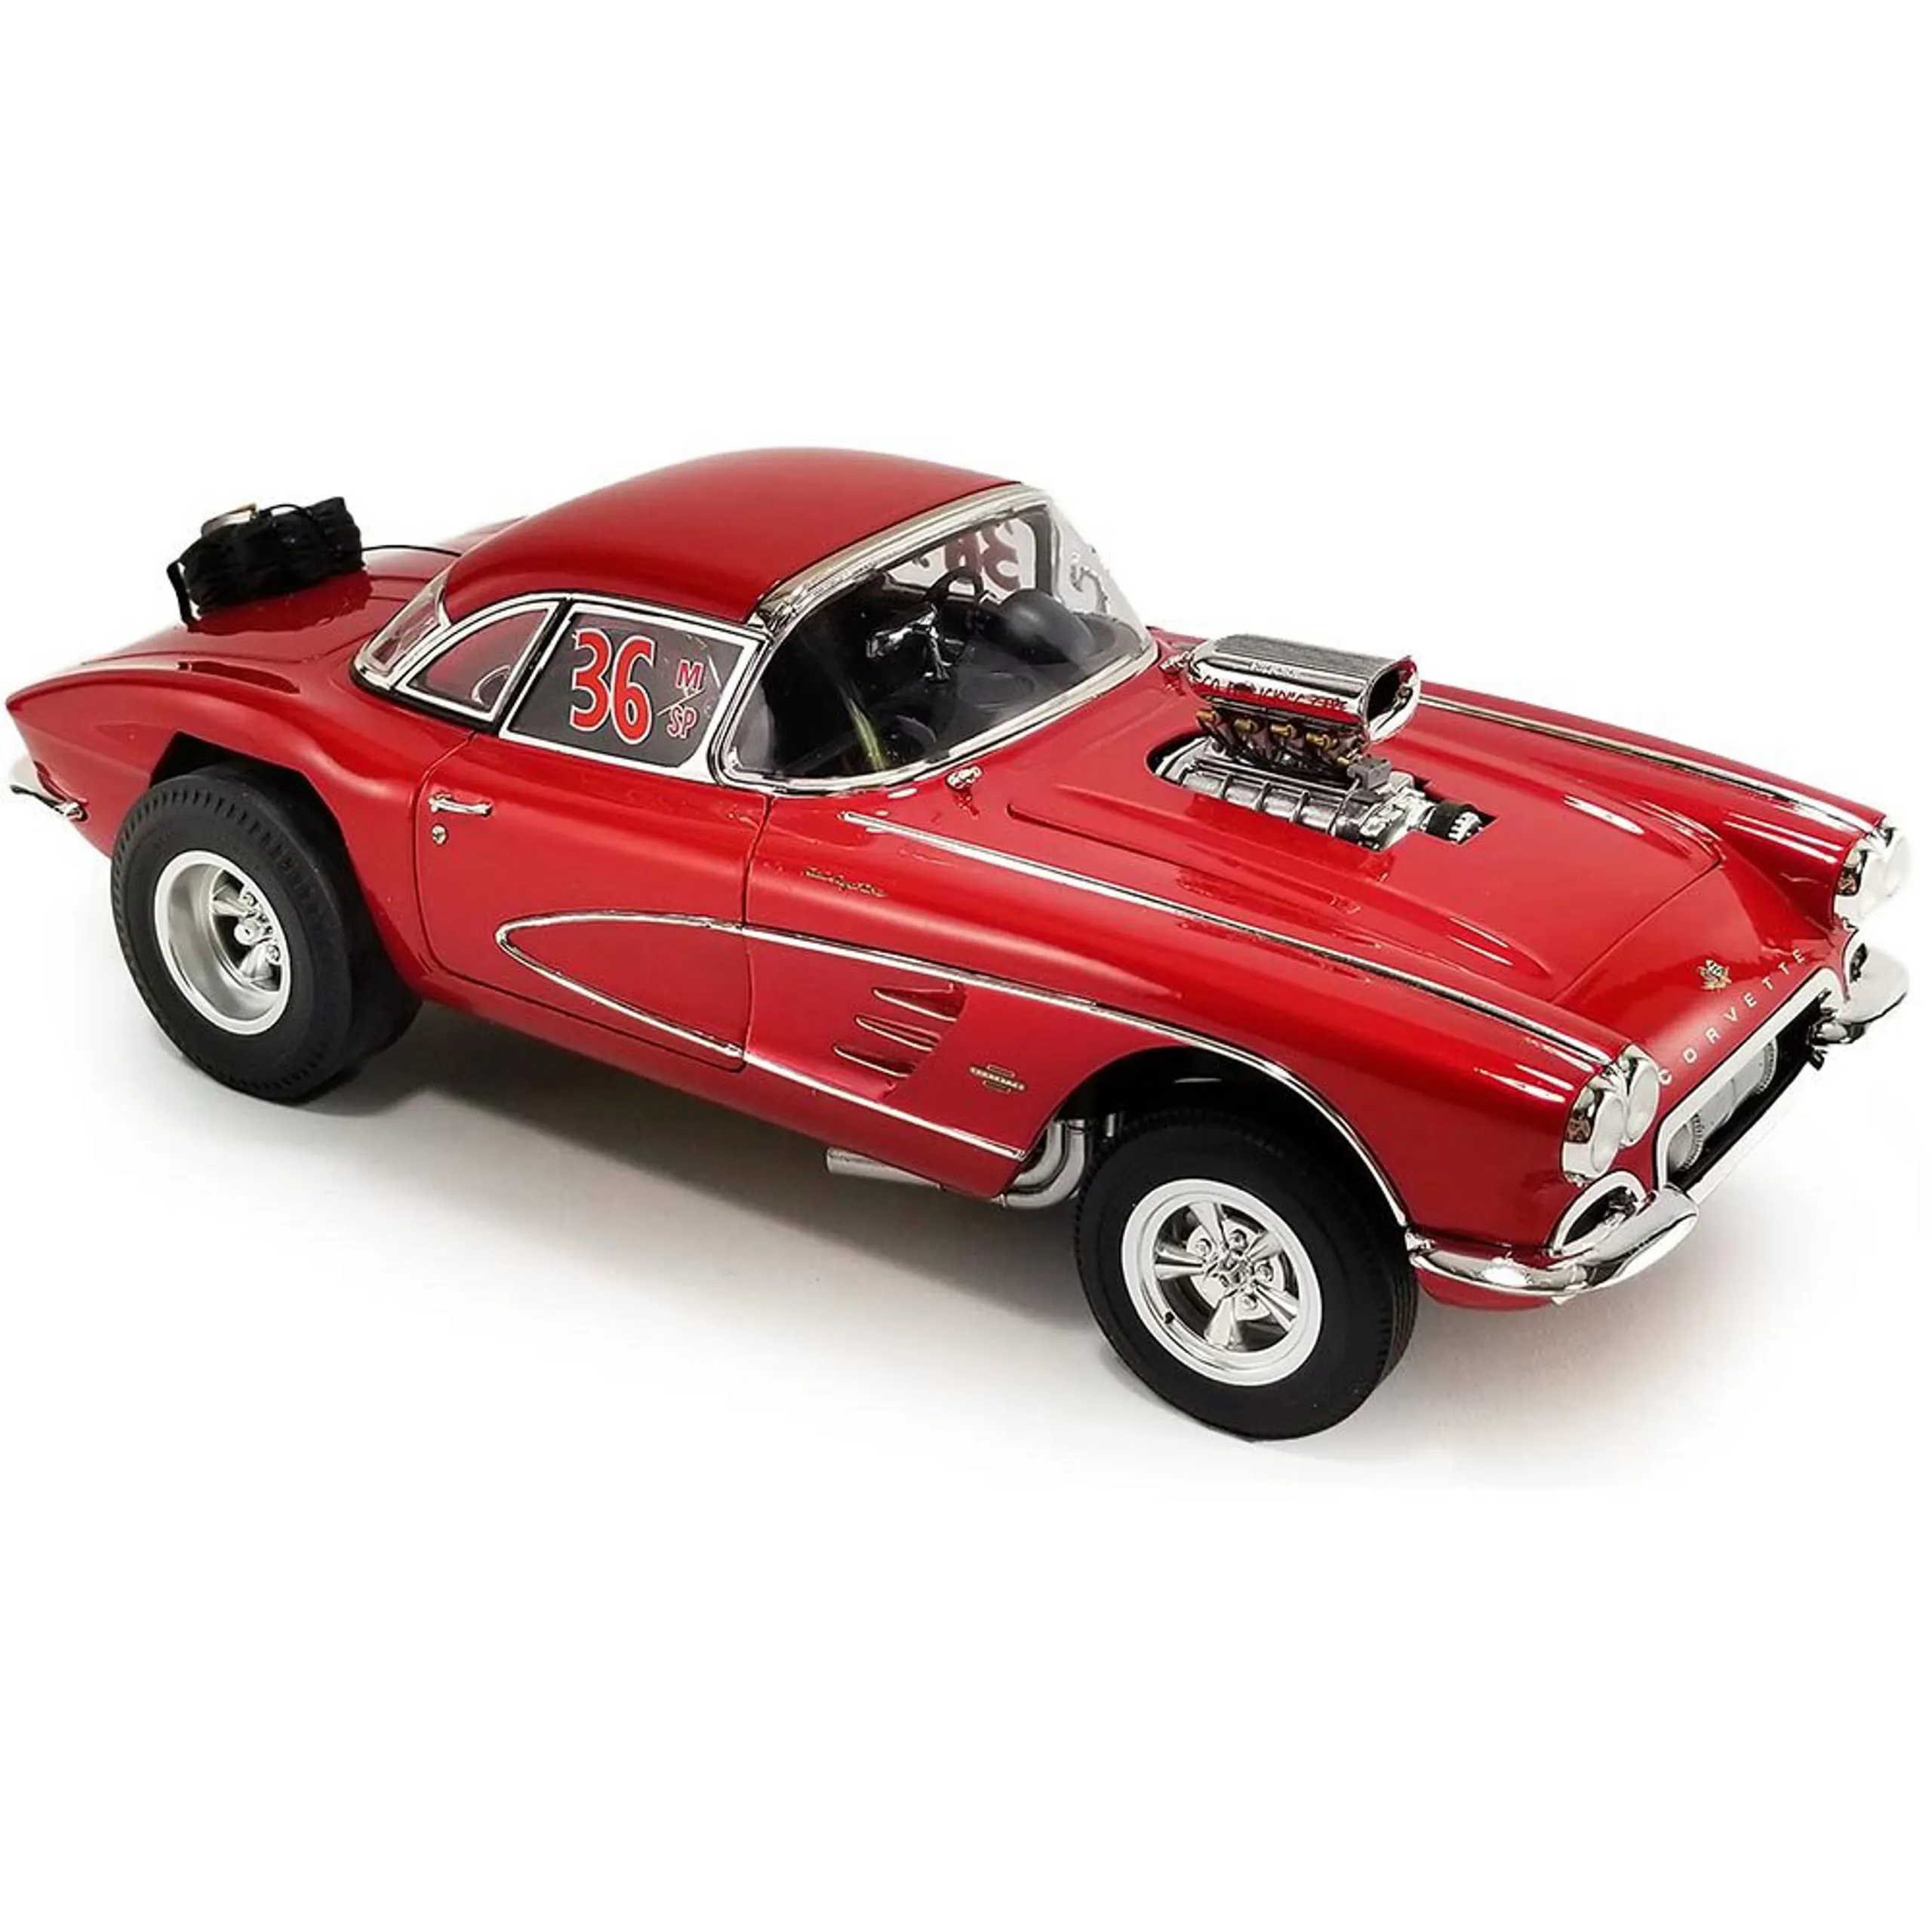
DIY Project 2 Wheel and Tire Upgrades
Wheel and tire upgrades can significantly enhance the look and performance of your diecast car. This project involves removing the original wheels and tires and replacing them with aftermarket options. The process typically involves carefully removing the original wheels, selecting new wheels and tires that fit the car’s scale and design, and installing them. Various types of wheels are available, including those made from metal, plastic, and resin. Choose wheels that match your desired style and the car’s theme. Different tire options exist, including those with realistic tread patterns and those with a sleek, low-profile design. This is one of the easiest upgrades to do.
Removing the Original Wheels

Removing the original wheels from a diecast car requires a careful and methodical approach. First, examine the wheel assembly to determine how the wheels are attached. Some wheels are held in place by axles that are pressed into the chassis, while others may be attached with small screws or pins. If the wheels are attached with axles, use a small screwdriver or hobby knife to gently pry them out. Be careful not to damage the chassis or the wheel. If the wheels are attached with screws, carefully unscrew them. Once the wheels are detached, you can proceed to install the new wheels and tires.
Installing New Wheels and Tires
Once the original wheels have been removed, it’s time to install the new ones. First, make sure the new wheels and tires fit properly. If the axles are too large or small, you may need to modify them. If the wheels are too large, they may rub against the body of the car. To install the new wheels, you may need to use glue or other adhesives to attach them to the axles. Be careful not to use too much glue, as this can cause the wheels to be difficult to remove later. Once the wheels are installed, make sure they spin freely. This will ensure that the car rolls smoothly.
DIY Project 3 Interior Detailing
Interior detailing can dramatically improve the realism and visual appeal of your diecast car. This project involves enhancing the interior components, such as the seats, steering wheel, dashboard, and other details. The process typically involves disassembling the interior, adding details using paints, decals, and other accessories, and reassembling the interior. Consider the colors, materials, and design of the car’s interior when selecting your materials and techniques. You can add details like seatbelts, custom upholstery, and a detailed dashboard. This is where your skills can shine.
Enhancing the Interior Components

Start by carefully disassembling the interior components of your diecast car. This may involve removing the seats, dashboard, door panels, and other parts. Clean and prepare the interior components for painting or detailing. Use paints, decals, and other accessories to add details such as seatbelts, instrument panels, and other elements. When painting, choose colors and finishes that match the original interior or your custom design. You can use fine-tipped brushes and detailing tools to add intricate details. Pay attention to the textures and materials in the original interior, and try to replicate them using the right paints and techniques. Consider using different textures such as flocking to create a realistic look for the seats.
Adding Seats, Steering Wheels, and More
After the interior components have been prepared, it’s time to add seats, steering wheels, and other elements. You can use aftermarket parts, scratch-build your own, or modify the original components. Choose seats and steering wheels that match the style of the car. Consider using photo-etched parts for seatbelts, dashboards, and other fine details. Glue the new components securely to the interior. Reassemble the interior, making sure all the components fit properly. This will give you a nice, professional, look.
DIY Project 4 Weathering and Realistic Effects
Weathering and realistic effects can add depth and realism to your diecast car. This project involves creating the appearance of rust, dirt, wear, and other signs of aging. The process typically involves applying washes, dry brushing techniques, and other methods to simulate the effects of time and use. Consider the environment the car would have operated in and the types of wear and tear it would have experienced. Use reference photos and real-world examples to guide your weathering techniques. The goal is to make the car look like it has a history.
Creating Rust, Dirt, and Wear

To create realistic weathering effects, start by applying rust, dirt, and wear to the car’s body and chassis. Use weathering powders, pigments, and washes to create these effects. Apply rust effects to areas that are prone to corrosion, such as the edges of panels, the underside of the car, and the exhaust system. Use dirt and grime washes to simulate the buildup of dirt and dust on the car’s surface. Dry-brush techniques can be used to highlight raised details and create a sense of wear and tear. For example, paint the car with rust, apply dirt, and then use a sponge for a realistic look.
Applying Washes and Dry Brushing Techniques
Washes are a great way to add depth and dimension to your diecast car. Apply a thin wash of a dark color, such as black or brown, over the surface of the car. This will settle into the panel lines and crevices, creating shadows and highlighting details. Dry brushing is another popular technique for weathering. Dip a brush into paint and wipe off most of the paint on a paper towel. Then, lightly brush the remaining paint onto the raised surfaces of the car. This technique can be used to create the appearance of wear and tear, such as paint chipping and fading. Experiment with different colors and techniques to achieve the desired look.
Showcasing and Preserving Your Creations
Once you’ve completed your DIY diecast car projects, it’s time to showcase and preserve your creations. This involves displaying your models in a way that highlights their unique features and protects them from damage. You can create a display case or use a dedicated shelf to showcase your collection. Consider adding lighting to enhance the appearance of your models. Ensure proper storage and handling of your models to keep them in good condition. This will also allow you to protect your investments. Consider how you want to show them off.
Displaying Your Finished Diecast Cars
Choose a display location that is free from direct sunlight, which can cause the paint to fade over time. You can use a dedicated display case, a shelf, or even a custom-built display. Consider the scale of your models, their individual features, and the overall aesthetic you want to achieve. Arrange the models in a way that tells a story or highlights their unique features. Use props or dioramas to create a more immersive display. Consider adding lighting to enhance the appearance of your models and draw attention to their details. Keep the display clean and dust-free to keep your models looking their best. If you’re looking for protection, glass cases and plastic cases are readily available.
Protecting Your Models from Damage
To protect your diecast car models from damage, handle them with care. Avoid touching the painted surfaces with your bare hands, as this can leave fingerprints and smudges. Use soft cloths or gloves when handling the models. Store your models in a cool, dry place away from direct sunlight. Dust your models regularly with a soft brush or cloth to prevent the buildup of dust and dirt. Consider using display cases or protective covers to shield your models from dust, moisture, and accidental damage. By taking these precautions, you can ensure that your diecast car models remain in pristine condition for years to come.